Contributor: Nerds
Table of Contents
Introduction
The Labyrinth is a game mode in which you do a series of battles in which the energy and health of your own heroes carries over from battle to battle. Once you beat certain battles, you will get rewards such as Labyrinth Coins, experience, and gold. Additionally, you will also have the opportunity of choosing between 3 randomized relics. These relics can range from blue, purple, or gold in color. Blue is considered the weakest, purple is in the middle, and gold is the strongest.
Special Tiles
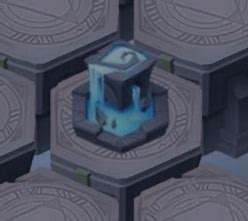
The Fountain of Vitality regenerates all living allies HP by 50% of their maximum health. You never want to go for this as it loses you Labyrinth coins and you can just use Dura’s Tears.
The Mystic can revive one random ally hero, or if there are none dead, he restores the lowest HP hero’s full HP and energy. You never want to go for this as it loses you Labyrinth coins and you can just use Dura’s Tears.

The Abandoned Wagon lets you choose one of four heroes to use for the remainder of your Labyrinth run. These heroes’ power is determined by your account strength. You never want to go for this as you can just hire a mercenary from a friend and the heroes in it are typically weaker than your own.
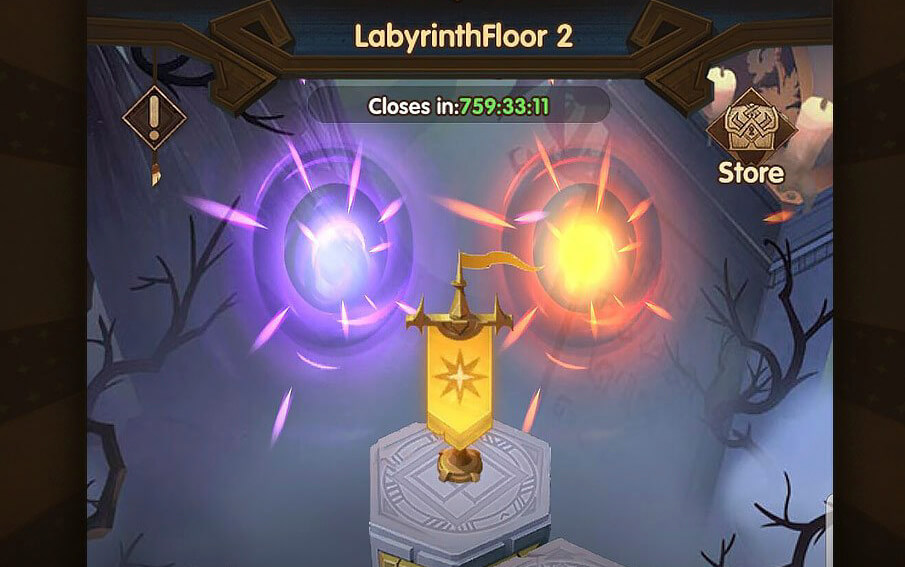
Once you clear stage 9-24, you will see 2 portals at the end of the 2nd floor. The purple one is completely normal. However the orange one leads to “hard mode” and will have a special tile with a mini-boss. The mini-boss will drop either 3k labyrinth coins, 10k challenger coins, or 3k guild coins. Go into the orange portal if you can beat the mini-boss (which is extremely easy). If not, go with the purple portal.

The Dark Wagon consists of a 5v1 battle against a random hero whose level is much higher than your own heroes. After defeating this hero, you will be able to use it on your own team at that level for the remainder of the current run. Unfortunately, there is rarely, if ever, any scenario where the Dark Wagon tile is worth choosing. (This type of tile is only seen in the Hard Mode floor)
Wrizz is a boss tile only found in the Hard Mode Floor. It is another 5v1 battle against a modified version of the Wrizz boss fought as a Guild boss. The main challenge of beating this boss is having enough damage to kill him in the alloted 90 seconds (if this is not done in time, **all** of the heroes on your team will die and he will run away, giving no rewards), as well as keeping your heroes alive for the entire duration of the fight. This battle is made incredibly easy by having a +30 Saurus mercenary, as he will take care of both the damage and survivability requirements on his own. Alternatively, just about any team can defeat this boss with appropriate relic choices. Many relics that are very strong in a 5v5 scenario, such as those that control both enemy frontline at the start of battle, are completely ineffective vs Wrizz. (This type of tile is only seen in the Hard Mode floor)

The Roamer is a tile where a merchant will sell 4 random choices from a predetermined pool of possible inventory. For most players the only choice worth considering will be red faction emblem chests, or grey faction emblem chests (which give a random assortment of faction emblems from the 4 main factions.) This is expensive though and should not be considered until the player has a decent roster in place already, somewhere in the vicinity of 20 heroes ascended.
General Tips
- Get a strong mercenary. Something that either kills the enemies very quickly or something that has sustain. Such as Ainz or Saurus. Lab can be extremely difficult without a good source of healing, so you may need instead to seek options such as Saurus (with his +30 signature item,) Talene, Lucius, Silas or Nemora, to keep your heroes’ health up. There are other options, these are only examples.
- Use mercenaries as much as possible, especially if your roster is small. Not only will this allow you to use heroes much stronger than you would otherwise have access to, but if a mercenary dies in a lab run, you can simply use a different mercenary instead. If your 3 mercenary slots are full, using “Return” will dismiss one and allow you to use one mercenary after the other indefinitely in Arcane Lab.
- Pick your path. It is always best to take as many fights as possible for more rewards, even if it’s 1 red flag vs 2 brown flags.
- Make use of the Auto, 1x, 2x, 4x, and pause buttons in battle. Stopping a battle if a hero dies and trying it again may allow you to save them from dying. Also, turning off Auto ult allows your heroes to save their energy and use their ults at the beginning of the next battle. This is extremely powerful with many heroes who have high impact ultimates, such as Tasi.
- Offensive Relics are generally more useful than defensive ones. This is due to several reasons:
- Attack Rating scales better than an equivalent amount of Defense when enemies are higher level than you, which is the case in Arcane Lab.
- Many healing and shielding spells scale off of Attack Rating, meaning that relics that give Attack Rating will increase both your offensive and defensive capabilities, while defensive relics, including those that give Defense stat, will not improve your offensive capabilities.
- While you can replace heroes on your team that die with mercenaries and other heroes you have leveled, as well as replenishing your entire roster with Dura’s Tears, there is no safety net if your team and relic choices lack damage.
- It is much easier to change your formation and retry to make sure none of your heroes die, than it is to make up for lack of damage.
Notable Relics
- Heroes’ Hope: Large stat increase for Hard Mode, useless outside of it.

- Spider Thread Gloves: Very powerful in 5v5 battles, useless vs Hard Mode Wrizz battle.

- Icebringer: Very powerful in 5v5 battles, potentially the most powerful relic vs Hard Mode Wrizz.
- Firebringer: One of the stronger defensive relics, incredibly powerful when combined with Icebringer.

- Ragespike: Relics like this one stack, and Ragespike is one of the strongest. All 3 variants are worth taking. Note: The bonuses from this relic do not count previous battles, so taking this immediately before Hard Mode Wrizz or the final battle will yield very little or no benefit.

- Moonstone: Can be very powerful depending on the team, but generally always somewhat useful.

- Sunstone: Less useful than Moonstone, since your team should already have enough healing without it, this relic is well worth choosing if you already have Moonstone, as the amount of health and energy regeneration becomes incredibly high when they are combined.

- Shard of Intellect: Due to the fact that you are storing energy and using ultimates right at the start, the trigger condition is not an issue. Thus this is just a free attack buff if you are using a Mage hero.

- Demon’s Deceit: This relic is a combination of defense and offense which makes it rather good. It also doesn’t rely on the special Hypogean buff attached to the relic. Just a straight-up life-steal.